I forgot to post the pictures, but Excelsior was completed! I want to share some of the photos with you, and then point you to the gallery where all the finals are stored. I usually do model building as a means to relax, but under these circumstances of spending most of my nights over at Robert’s garage in the freezing cold. And the freezing cold had a weird effect on the painting sessions. It took much longer to dry, which I explained in an earlier post. This prolonged my plans. All told, the entire project took 31.75 total hours.
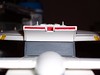 Let’s begin with the impulse housing. This was kind of a pain, because the small red strips embedded within the rear housing were a bitch to paint and even harder to cement in. If you look closely at the detail, you might see some of the red streaks that the CA glue dissolved as I was forcing it into place. There’s also a small trapezoid piece that fits in between the twin slats, though I’m unsure as to what that’s supposed to be simulating, since the small strips were pretty much the engine nozzles. While I was trying to fit them in… I dropped one of them and lost it amongst one of the toolboxes. I was cussing up a storm when I did that, because that meant I would have no piece anywhere in there. And the model would have been incomplete.
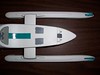 One of the problems I noticed while working with oil enamel was that some of the paints were a little too thin when applying a coat. Unfortunately, this meant additional touch-ups were noticable. On the underside of the engineering hull, the Pacific Blue strip needed one more coat because it looked really patchy. The Dark Grey panels to the rear of the strip were quite the bitch. I mean, holy hell… no matter how much I painted, I couldn’t quite get it to fill in the panel completely and the way I was handling the brush… I didn’t trust myself to do it freehand. Near the aft section, there was this little piece that had the two tractor emitters and a vent. I had fun just touching Dark Grey to the vent, and Chrome Silver to the emitters. I used a light hand and managed to keep the paint within the bounds of the emitters, but the vent overlapped a little bit.
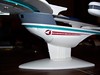 This is a tight shot of the port side engineering hull. The Pacific Blue strip was the more difficult part to paint. I used a long strip of low-adhesive masking tape to act as a guide. It eventually bled over, but we were able to save it by scraping off the excess with an Xacto knife. Really light scraping, so I didn’t lose the primer at all. The Dark Grey on the neck of the ship was the easiest. For some reason, the coats I applied were really smooth. This was probably because it was curved nicely, and at an angle that allowed me to use gravity a bit more than on other pieces. I used Flat Black for the torpedo tubes. Cobalt and Grabber Blue for the navigational deflector.
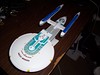
 This is a better view of the neck and forward section of the engineering hull, not to mention the underside of the saucer section. The original decal set required pinstriping, but Excelsior did not have the pinstripes that Enterprise-B had, so I decided to skip using those parts of the set. When I build Enterprise-B, I’ll use them. The block stripe on the underside of the saucer looks a lot better with an additional coat of Pacific Blue.
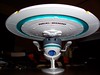
 Here’s a beauty shot. Overall, I think I did pretty good, considering this is the first model I’ve done since… 1999. I’m looking forward to moving onto something a little more complex, like the Reliant model I got in the mail. I just hope Todd likes it.
View the complete gallery at Flickr.